Mount the brackets to the wall or window frame, with the outside brackets no further than 2inches (5cm) from the ends of the headrail. On wide shades, space the additional bracket(s) at equal intervals.

For wall or outside mounts, use the rear bracket holes.
Make sure the release tab is always mounted on the bottom.
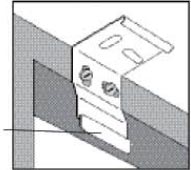
For inside or ceiling mounts, use the top bracket holes.
Make sure the release tab is always mounted on the bottom.
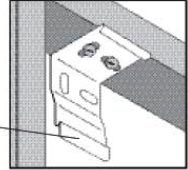
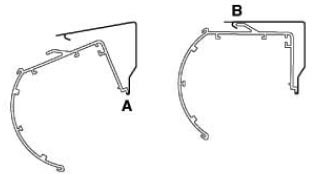
Mount the headrail. Position the headrail with the front panel (A) resting on the top lip of all brackets. Push the bottom front of the headrail firmly backwards and toward the window until the lip on the rear of the headrail engages the bracket and snaps into place, (B) as shown.
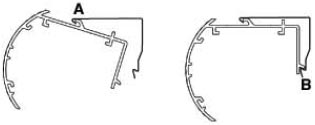
For wall or outside mounts, use the rear bracket holes.
Make sure the release tab is always mounted on the top.
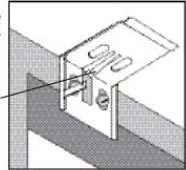
For inside or ceiling mounts, use the top bracket holes.
Make sure the release tab is always mounted on the top.
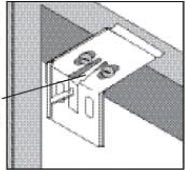
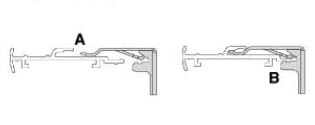
Mount the headrail. Position the headrail so that the furthest lip of the bracket slides underneath the groove on the headrail at (A). Push the front of the headrail firmly backwards and toward the window until the lip on the rear of the headrail engages the bracket and snaps into place, (B) as shown.
For wall or outside mounts, use the rear bracket holes.
Make sure the release tab is always mounted on the top.
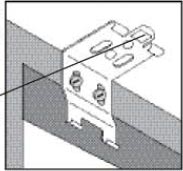
For inside or ceiling mounts, use the top bracket holes.
Make sure the release tab is always mounted on the top.
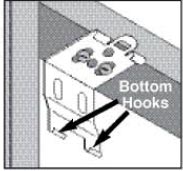
Mount the headrail. Position the headrail with the back panel (A) resting on both bottom hooks of all brackets. Push the front of the headrail firmly unwards and toward the window until the groove at the top of the deadrail snaps into place , (B) as shown.
2. Install the Tension Device. The Tension Device reduces the hazards of strangulation and entanglement of young children by limiting access to the control cord. Anchor the Tension Device, that is attached to the blind?s control cord, to the window frame or wall, so that young children cannot pull the cord around their necks.
A. Lower the blind.
B. Hold the Tension Device upright so the Warning Tag hangs straight down as shown in the diagram.
C. Position the Tension Device on the window frame or the wall so that the Tension Device and control cord do not interfere with raising or lowering the blind. The Tension Device should be installed without stretching or pulling down on the control cord. Stretching the cord will cause excessive wear. Do not twist or cross the control cord.
D. Holding the Tension Device upright, and in position, as shown, insert and secure the screw through the hole. The mounting screw must be secured into a solid surface or molly.

3. Operate the shade by pulling down on one side of the cord - one side of the cord raises the shade, the other side lowers the shade. Do not lift the bottom rail with your hands. Also, be careful not to place objects on the window sill that will interfere with operating the shade or cause it to hang unevenly
4. To remove a shade; Cassette 80: from the bottom rear of the headrail insert a flathead screwdriver in between the headrail and release tab. Gently twist the screwdriver and pry open the bracket to release the headrail. Raceway: Insert the screwdriver behind the headrail and engage the release tab.. press it upward to release the headrail. Cassette 120: from the top front of the headrail insert a flathead screwdriver in between the headrail and release tab. Gently twist the screwdriver and pry open the bracket to release the headrail. As you release the brackets, support the headrail to keep it from falling.
