1. MOUNT THE BRACKETS.
The open end of each bracket faces downward, as shown in the drawing below.
NOTE: If you have an inside mount and must use ?inside mount holes,? you will have to drill your own holes in the side of the bracket. Use at least two screws per bracket, and make sure that the screw heads clear the clutch.

2. INSTALL THE SHADE.
Push the clutch straight onto the blade of its bracket. The bottom of the clutch should always point straight down, as shown above. Lower the lug of the end plug onto the ?V? of its bracket. The roller should fit in the brackets securely, with just a little play.
ATTACH FASCIA PANEL Attach the fascia by first hooking the top lip of the fascia panel onto the bracket as shown. Swing the bottom the fascia panel towards the bracket and gently press at the bottom to the panel until the lip on the fascia engages and snaps locked to the bracket.
3. ATTACH STOPS TO METAL OR PLASTIC BEAD CHAIN. For plastic bead chain:
use connector for top stop and attach another connector for lower stop. For metal bead chain: attach a metal stop ball at least 5/16? (8 mm) in diameter so that it touches the clutch when the shade is rolled all the way up. For both kinds of bead chain, lower the shade to sill or floor height, and snap the appropriate metal stop or plastic connector on the opposite side from the stop, so that the shade cannot be lowered beyond that point.
4. INSTALL THE TENSION DEVICE
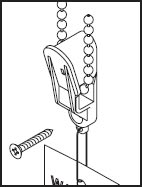
The Tension Device reduces the hazards of strangulation and entanglement of young children by limiting access to the control cord. Anchor the Tension Device, that is attached to the shade?s control cord or bead chain, to the window frame or wall, so that young children cannot pull the cord or bead chain around their necks.
a. Lower the shade.
b. Hold the Tension Device upright so the Warning Tag hangs straight down as shown in diagram.
c. Position the Tension Device on the window frame or the wall so that the Tension Device and control cord do not interfere with raising or lowering the shade. The Tension Device should be installed without stretching or pulling down on the control cord. Stretching the cord will cause excessive wear. Do not twist or cross the control cord. If using stop balls on bead chain, position the tension device 1/4 inch higher to allow the stop ball to pass thru the tension device.
d. Holding the Tension Device upright, and in position, as shown, insert and secure the screw through the hole. The mounting screw must be secured into a solid surface or molly.


5. USE THE CONTROL CORD OR BEAD CHAIN TO OPERATE THE SHADE.
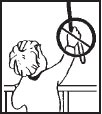
Pulling gently on one side of the control cord or bead chain raises the shade; pulling down on the other side lowers it.